Showing posts with label photos. Show all posts

Thursday, December 30, 2010

White Christmas

Hope everyone had a relaxing Christmas or failing relaxing an enjoyable one !

According to the Bablake weather station , which is a great local weather station based at a school, this was one of only 3 years in the last 40 where there has been snow on the ground on Christmas day on Coventry!

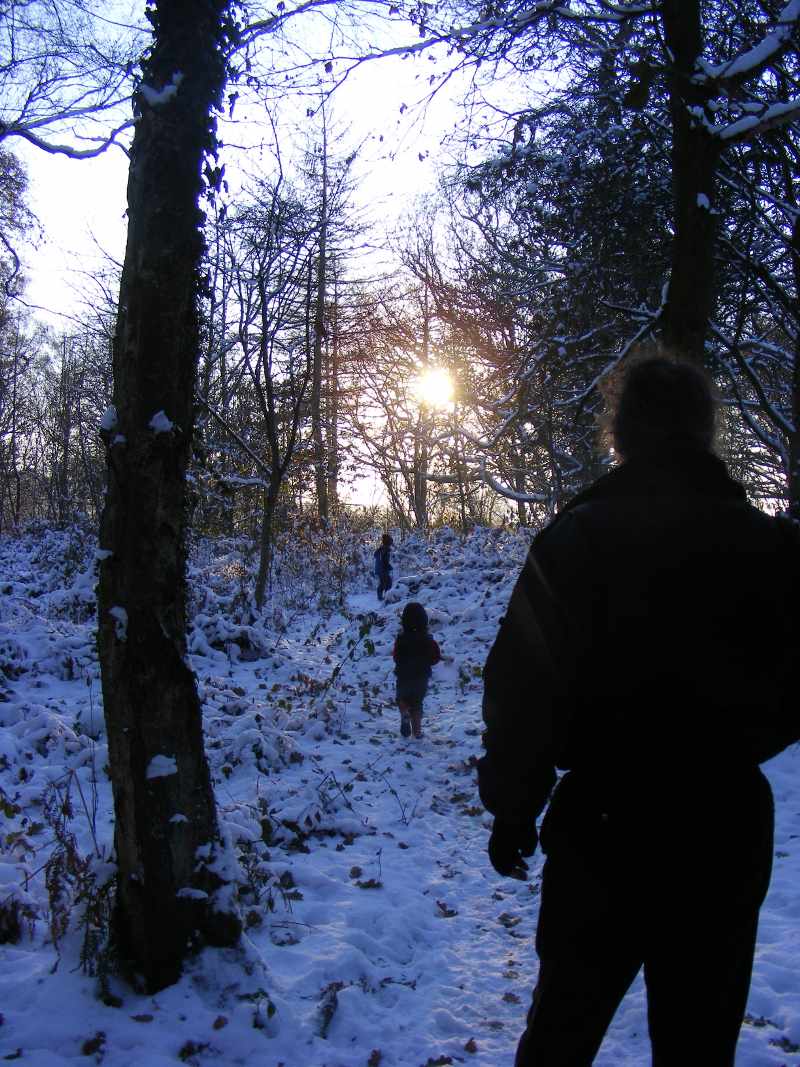
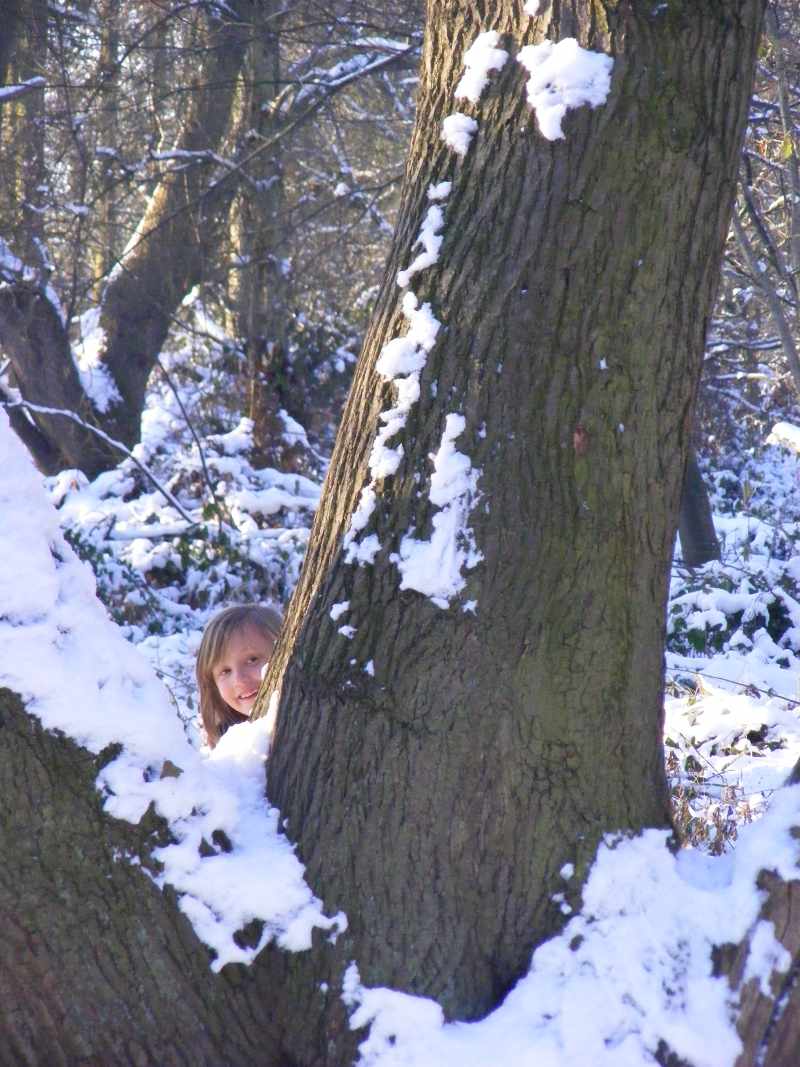
I went out late morning to clear the path and decided that it was far to nice a day, cold but sunny and quite warm really, well compared to the last couple of weeks and so I announced Christmas lunch was going to be at tea time and we were going to the woods ! It seemed as nature had given us a White Christmas we should make the most of it!!

I have used one of the photos I took as a background. I don't generally like patterned backgrounds to text but I Hope I have muted the middle section enough to make this readable.

Here are a few more.
 Walking in the woods


Hide and Seek !!


Daddy shoulders are great when you have run out of energy!
 Silhouette from the low winter sun!

Thursday, December 23, 2010

A busy time of year but no posts

This time if year I make things but can't post them as they are Christmas presents and some of them I have given away without photographing but after Christmas I hope to put up some posts about such things.

In the meantime it has been a very early winter in the UK. Much more snow and low temperatures than normal and my parsnips are firmly frozen in the ground when normal you would expect to be able to go and dig them for Christmas dinner. The tradition of planting garlic and onions on boxing day seems unlikely to.

According to the Bablake weather Station the lowest mean temperature for December until this year was -0.1°C in 1981 and currently we are standing at an average this month of -0.8°C so unless it really warms up over the next week or so this looks like a record breaking cold December!


One thing we haven't had much of is snow. well compared to the rest of the country anyway. We have snow and that's un-usual enough before Christmas but places both North and South of us are seriously effected by it where as we just have a small amount making things look white !  We did have enough the boys got to go sledging a couple of days ago but so far we seem to have managed to be on the edge of off a snow clouds so we have just got a bit here and there whichever side of us the main area of snow has been.

Great Tit

One thing we have been making sure we do is keep the bird feeders stocked up. Our regulars include sparrows, blue tits, great tits, coal tits, collared doves, squirrels, a nuthatch and possibly dunucks though we arn't sure on those, they look rather like sparrows at times. I think I've spotted a wren a couple of times too but again it's flighty and keeps mostly out of the way.

nuthatch

Tuesday, January 19, 2010

Mosaic week 2 - more snow and sledging.


This week's Mosaic is rather late for Monday but I just ran out of time, that and my rather dodgy computer decided to crash when i was most of the way through it but before I saved it!!

It is very rare for us to have snow for this long, more than a day or two at a time is very uncommon in fact so that I have two weeks in a row of snow pictures in not something to miss. These were all taken on Wednesday. We were asked to pick up Treestump from nursery early as the staff wanted to get home before things froze so I went to get him walking through one park in falling snow (top three photos) and Tom went to get Noddles from school. After school we all headed to a second park which in fact is just over the road from the first to sledge, by this time it had stopped snowing but the sky was very grey making the light levels quite strange it felt almost as if my glasses were in need of a clean but it was just the way everything looked...

This second park is just a big flat field except for the fact it has a bank round the edge next to the road and this bank is big enough to sled down. Normally this park is empty apart from the occasional dog walker or someone taking a short cut but as you can see it was really quite full of poeple sledging, having snowball fights or just enjoying themselves out with friends. The bottom right photo is Treestump trying to throw a snowball.. problem was he could pick up just enough snow to coat his glove but not enough to have some to throw! It was very funny if frustrating for him.. In the end he worked out there were bigger lumps he could pick up form around where others have dug up snow for snowballs.!

I love the way the snow and the light made the trees monochrome even though in the lower pictures it is mostly Rhododendron which are evergreen. It made the bright waterproofs the boys were wearing stand out all the more.
.

Monday, January 11, 2010

Week 1 - mosaic


I am not trying the 365 photos thing again but would like something to encorrage me to take photos often so I'm going to try doing a mosaic a week. Sometimes they may be themed like this week, other may be a hodge podge of whatever I snapped that week.

This week has been dominated by snow. For many people this much snow is minor but we don't often get it so for us this much substained snow is unusual. Much of the rest of the UK have had even more and for longer which is even more un-usual certainly for the more southern areas that have been hit by it.

Looking at this it looks like I live somewhere rural. Believe me that isn't the case. All these were taken either in parks or on our allotment all of which are in the middle of Coventry a city with about 300,000 poeple in it.

I am posting this up on Mosaic Monday over at Little Red House.

Monday, August 10, 2009

Canel trip

We have been away for nearly a week on Tom's parent's canal boat, the lovely and beautiful Apple Queen. She is 62 foot long I believe and very well kitted out inside for what is not a very big space. In the mosaic below you can see her outside and indeed about half the inside. What you can see is the sitting area, which is set as a double bed in the photo, the dining table and kitchen beyond.. In front of that is the bathroom and another bedroom. The dining table area also converts to a double bed so in all she sleeps 6.

It has been lovely and peaceful pottering along the canal and though we did have limited internet access it was slow and only really used to check for urgent emails. The boys enjoyed themselves very much though of course a 16 month around that much water needs careful watching particularly around locks which are potential death traps if you fall in one especally so when the water is going in or out.. For any that don't know a lock is a short contained area of canal long enough for a boat and wide enough for one or sometimes two boats. It is shut off at each end by a gate and you can then open various paddles to raise or lower the water level allowing canels to go up and down with the geography. There is a max speed of four miles and hour and often you have to go slower than that to avoid damaging the bank with the wash or rocking moored boats so live is very relaxed and slow..

The scenery was fantastic and I am sure you will see some more photos later though we did have to dodge the rain at times and by the time the sun was out I had run out of battery power and kept forgetting to recharge them.

I did get some crochet done in various moments which I will blog about later but for now it is bedtime for the smallest. I'm adding this post to the mosaic monday list over at Little Red house so pop over there for more eyecandy.

Monday, July 20, 2009

Green


These are a few images from the allotment taken last week including the lane I mentioned a few posts ago.

For Mosaic Monday over at Little Red House. though she isn't running the round up this week.


Saturday, July 18, 2009

GIMP Tutorial

I have talked to a couple of people recently about using GIMP for scrapbooking and similar so thought I would cover it a little bit more here. GIMP is a great package which does pretty much anything Photoshop does at least for us mortals. The great thing about GIMP is that it is open source which means it if free and constantly undated by a wonderful bunch of people who write new bits because they can and like doing it, in fact anyone can join in if they like or do their own bits that is what open source is all about. That really appeals both to my none capitalist side and to the geek in me.

While I am not an expert I have learnt a bit on using GIMP over the last year or so and offered to do a tutorial or two, so here goes. This is the very first one I've ever done and is how to use GIMP to make a mosaic as Mary over at Little Red House hosts a Mosaic Monday and Kamana at Journalling Through Photos mentioned she was looking at other options for make mosaics. I think learning to use an adaptable package like GIMP means you have many more options that a specific mosaic package though those are great too.

First you need to download GIMP, there are plenty of places to do this but I'd go here as it is the official source.
http://gimp-win.sourceforge.net/stable.html

Once you have GIMP installed open it up.
You will have the toolbox and a document open up each in their own window.

First thing I suggest you do is go to the menu bar on the document window, pick Windows, dockable dialogs and then pick layers. This opens a third small window, make sure you can see all three as they can hide behind each other.

Then you need to decide what size document you want. I picked 600 by 600 pixels which is a good size of using on line, it's the sort of size most scrapbooking forums suggest to load up scrapbooking pages and gives you enough space to have good detail without being to big, it is also easy to divide by 3 which for the design I am planning is useful. To do this pick New from the file menu on the document window, fill in the number of pixels you want. (you can also chose to do this in inches, mm etc if that seems more understandable).

You should end up with something looking like this. (All pictures can be seen in larger versions by clicking on them)
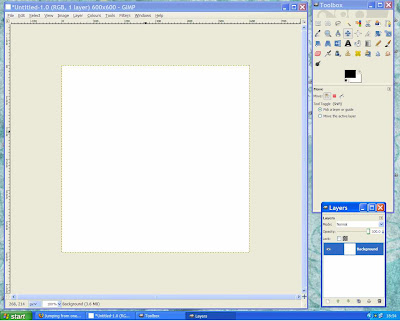
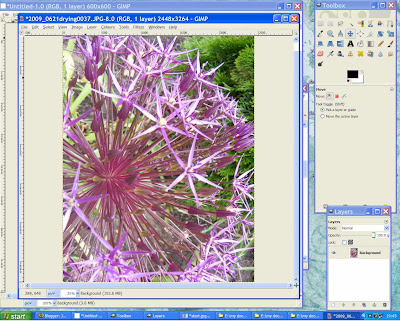
Next find your images, open up the first one by going File , open.. search for the image you want on your computer and open it. Now you will have your picture in another window.

You can use as is or crop it down to a shape you want, for instance square. To crop you need to pick the crop tool from the toolbar, which looks a bit like a craft knife. I have highlighted it in the next picture. The click on one corner of your image and drag the cursor across and down, keep an eye on the two numbers in the size fields and when the two match you have a square. The area you have not selected will be greyed out.
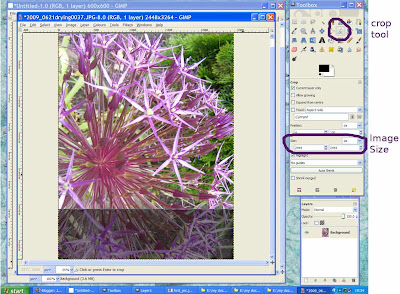
You can move the selected area about by clicking and dragging in the middle and indeed you can change the size by hovering over an edge till you get a little split line with a triangle behind it, clicking and dragging will move that side of the selection only. However a click without dragging will crop the image to your selection. This leaves you with a canvas bigger than your image which is what the chequered background means in the image below. To get rid of the selection just click somewhere outside the selection.
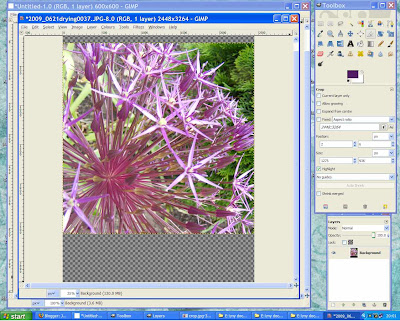
There are many other things you can do to the image but that is another tutorial. At any point you can go back to a previous step by going Edit, undo.. you can keep going back as far as you like.

Now you want to get the image to a sensible size to go in your main document as if your camera has the sort of resolution most do these days it will be far too big for document. Go to the Image menu and pick scale image. Put 600 in the width, click on the height and that should change to be the same as the width because your image is square. Click scale and you will have a smaller image.

Now we have a picture we need to transfer it to our main document. This is simply done by picking copy from the edit menu just as you would in word. Then go to the main document and pick paste from the edit menu. At this point you will probably find the image is not showing properly.

Go to the layers window you will see two items, a background and one labelled floating selection, you need to confirm this before going on. Click on the little page symbol at the bottom left, this confirms the layer and changes it to pasted layer.
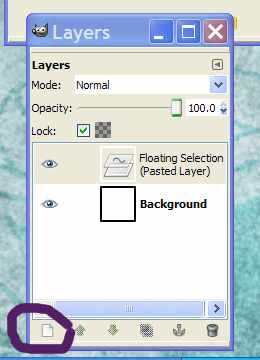

Do the same with other pics.. which will give you a whole bunch of layers showing in the layers box but you will only be able to see the top on in the main window as they all fill the space available. You can use Image - Transform to rotate if needed.

Now you need to decide what layout you want. I decided to go for one big picture 400x400 and then several 200x200 pictures around two sides of that.. like this
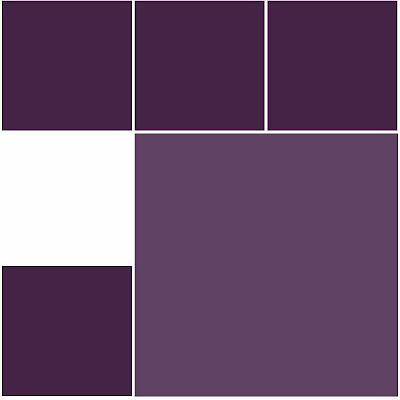
To get this we need to change the size of all the photographs. You can either do this using the Layer menu and pick scale layer or use the scale tool. Make sure you take a little off for the size you make it so you have a border. For instance I made the 400x400 one 395x395.

The scale tool is marked in the next photo, remember if you want to keep the scale the same click the keep aspect button at the bottom of the toolbar.
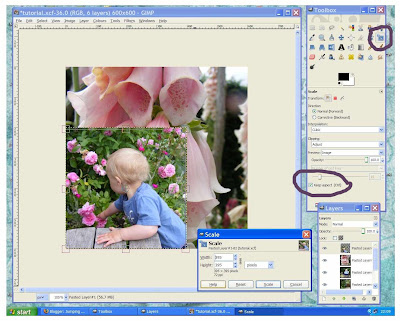
If you want to see layers lower down you can hide the upper ones by clicking the little eye symbol next to the upper layer this hides the layer.
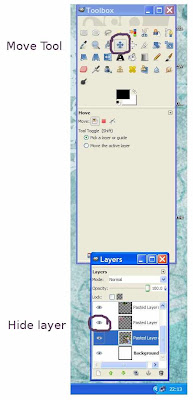

Once you have sized the photos you need to move them to where you want them. Use the move tool, the one with four arrows pointing north, south, east, west. Make sure you have the layer you want to move clicked and the cursor needs to show the same symbol as the move tool without a pointing hand. You will see what I mean when you move the cursor around. Then just hold down the left hand button and move the photograph to where you want it.

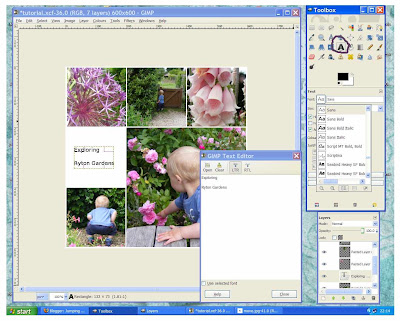
You can use the text tool (the big A) to add text. As you can see below you can the font and of course size etc. You get an extra window open up to type the text in so if you don't see it try moving the others around or look for it on the bottom bar which you have all the links to windows.
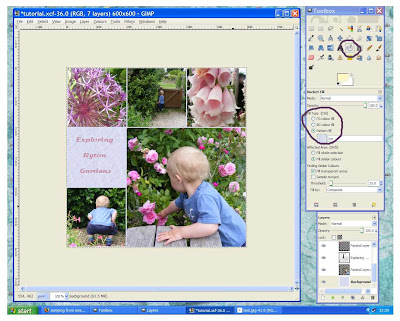
Finally you can change the colour of the background. To do this scroll down the layer window till you find the bottom layer labled background. Then pick the fill tool, the one that looks like a paintcan with paint flowing out. You can pick the fill, in this case I picked a pattern called ice. If you pick background or foreground colour you can change the colour by clicking on the coloured boxes just below all the tool symbols and picking the exact shade you want.
Finally save the file. If you want to work on it again or save it to use as a template for another mosaic then save as a .xcf file. Then for the version to post up on your blog save it as a .jpg. You will be asked if you want to export it, say yes and then pick about 45% for the quality seems to work well for me and gives you a sensible size file.

Well there you go I hope that is some help and I am sure it could be better written so please say if any bits are unclear.

Monday, July 13, 2009

Mosaic Monday


Mary over at Little Red House runs Mosaic Monday and as I'm quite fond of mosaics I decided to join in.

A visit to Ryton organic gardens a few weeks ago. I didn't manage to get a picture of him with low box hedges but they fascinated him.

Tuesday, July 07, 2009

Just a quick scrapbook page


Done for my mum of the recent roleplay pictures. Using a lovely kit from June at Cen's Loft called My little Garden.

Friday, May 08, 2009

A month in pictures


Stole the idea off Lucy at Attic24. Hers are very bright and cheerful and she made more than I did last month which wouldn't be difficult. I hope this month will be different on that score ie I will make more not that she makes less :)

Still I quite like mine and it's less effort that 365.

Tuesday, May 05, 2009

Photos

Noodles and I had to stop and take this picture as I drive a Smart car, though a grey one and we thought this was great with the matching blossom.

Plenty going on at the allotment.
helping with the compost
exploring
Gormites on patrol
DS in the shed, he's very proud of it can you tell !

We also went to the Earlsdon festival but it was rather cold so it was a quick run round the plant stalls, I only bought one iris, and a couple of rides for Noodles. He has got much better on things like slides and had three goes on this hug slide with much glee. Treestump wanted to join in but had to settle for a ball on a elastic keychain thing..

ball and chain boy!

Wednesday, April 22, 2009

Drayton Manor photos

We went to Drayton Manor yesterday which is a zoo come amusement park. We took Noodles with us but left Treestump at nursery as we decided he was a little young for most of the rides and taking him would limit what we could do. Noodles is now big enough for most rides and quite a few he could do on his own (though he only did that once) however he was just short of the proper adult rides including the big water ride which he would have really like to go on. He did however manage to have 21 goes on various rides and decided the best three were bumper cars, the troublesome trucks rollercoster (in Thomas Land) and the rapid ride (the water ride he was allowed on).

Rather scarily we had measured Treestump that morning and he is 80 cm high which is only 10cm under the min size to ride alone on a lot of the smaller rides, I don't think he will be anywhere near old enough to do that by the time he is 90cm!

We took a good few pictures though i don't feel right showing ones with other people in on our blog.

Firstly a few on Tom and Noodles on the rides (there are a few of me and I might find one I like later to show you).
On the troublesome trucks
On the rapids ride just as they get very wet.
and the after shot where he is going argg I'm wet!!
I'd like to point out this was the second time on this ride, the first time we all went on and I got soaked but they both stayed pretty dry!

I took various pictures of the scenery on the rapids ride and had a bit of a play with effects on it as it was lovely and bright colours and strong contrasts.
This first one is a watercolour effect.
This one is playing with various levels of contrast etc.

I also took some good photos in the zoo part of the park some of which I plan to use later on cards or similar but here is a couple now.
I love this back shot
More later.

Tuesday, April 07, 2009

fabric egg and flower photos


I just like this photo for all it's faults.
Noddles has to have a decorated hat or boiled egg for the Easter parade at school. Now he wanted an egg but we both agreed that a boiled egg could not be kept after and so as I had just found this lovely idea on Reto Mama we decided a fabric egg would be better.

Fabric as duly chosen by him and i then sewed it. He put the stuffing in though. Are you as surprised as me at the colours he chose given he had a fair range to chose from many of them quite bright? He is going to decorate it some more so you never know what it will be like by the end.
I thought you might also like to see some of the Helibores we have in the garden this year as they have flowered amazingly.

I'm tempted to remove at least some of them as they current occupy the area you see as you look out the back room and one of the few sunny parts of the garden. Currently the leaves fill the bed for most of the summer which is rather boring. I will either move them round to the shaded side or take them to the allotment I think.
Finally a shot of Treestump who is now starting to grow out of 12 to 18 month old clothes even though he is only a few weeks past his first birthday ! The surface with the monitor on is at normal table height ! He is also now happily walking around everywhere and was off across the playground at school yesterday when i let him out of the buggy.. exploring without a care in the world !

Friday, February 27, 2009

365 - this last week

Catching up on my photos.

Last Friday 20th Feb Noodles and I went to the canal basin to play with clay at Youpuckeroo which is anew craft workshop place. As we walked up he said look an echo. Canal basin, canal basin, canal basin !!! Click on the photo to get a bigger version as always.
Echo
Sataday was a first in many ways. I made waffles for the first time, gluten free of course and I ate them for the first time too as they weren't common here before I went gluten free but the boys have become fans since then. as they still eat gluten.

My first waffles - sat 21st Feb
The weekend was mostly spent moving large amounts of concrete slabs to the allotment to use for paths etc. However as always there was small child time too. Currently the two most important things in life seem to be food and books.. he's started early on being a bookworm and every opportunity he brings me a book to share with him.

Sunday 21th - books and food.Monday 22st - The final tally of slabs.round 25 barrow loads !

I will have to stop there as either the camera or the computer is sulking and they are refusing to talk. Probably just needs a reboot ! I will post the rest later.


Blog Content

All of the photographs on this blog have been taken by Esther, that's me, unless they are being used to link to giveaways etc in which case they belong to the person who I am linking to. All text is my own words.
None of the content of this blog may be used without my permission.