Showing posts with label embroidery. Show all posts

Sunday, July 01, 2012

A trip with family, a sheep bag and Tour De Fleece 2012

I have finally got my spinning wheel out of storage and up and running again after many years spurred on by the idea of doing the Tour de  Fleece on Ravelry as a challenge to get me back into the swing of things. However as it turns out I couldn't start on day one as we were in Devon celebrating my aunt and uncle's joint birthday by travelling to the beach and back on a steam train ! Given this aunt was one of the main people to teach me about fleece, sheep, spinning, weaving and all the associated crafts and knowledge as a kid I think it was a good reason to miss it.
 Treestump taking photos


I loved this view of Minehead, all those flowers above the tide line and the old buildings, in the other direction it was much more touristy.  There were getting close to 60 of us in total on the trip and all those with kids and a good few others spent the two hours on the beach before the train took us back again. It was about the only two hour slot in the day it didn't rain and in fact was quite sunny!

 Padding on the beach.

Shortly after this Treestump got so enthusiastic about chasing the waves in and out he went out to far, lost his footing and went right under the water, he was fine and went back in later once we had removed his top to try and dry it a bit, being wise in the ways of small boys I had spare clothes with me too. I didn't get a photo of him soaking wet but my aunt did so I might get a copy later because he did look a sight !

We had a buffet meal on the train on the way there and a cream tea on the way back all made by the more local family members, it looked fantastic but I took my own food so as not to make life difficult and so I didn't have to get twitchy as with 60 people there is bound to be cross contamination.

 One of the things I did do was make my aunt and uncle a present, it is a satchel style bag with an appliqué, embroidered and needle felted scene on it. They used to keep rare breed sheep including Jacobs so it seems fitting to include sheep into the scene and the darker fleece I used is actually jacob fleece. The sheep in the foreground is meant to be a Jacob which all have horns. I hope they like it, she certainly appreciated the fabric it was made from and I'm glad I picked a good one from my stash as it has gone to someone with the knowledge and love of fibre to know the difference. It's all wool or wool mixes apart from the embroidery thread.


A close up of the sheep

a close up of the tree

Monday, November 28, 2011

A new outfit for a wonderful wedding.

A week ago we were just getting back from one of the most wonderful weddings I've been to. Then I got tonsillitus so I'm only just getting round to blogging about it now.

When I tell you we stayed here.


and I tell you the wedding was black tie you may see why I thought I wanted to make a real effort. Though mostly it was the fact it was my husband's only brother getting married which is a once in a life time event regardless of venue.

The hotel was fantastic as you would expect given the number of royals and other internationally important people who have stayed there. The ones most people will know of being the Middletons for the recent Royal wedding. The dining room and indeed pretty much everywhere we ate the entire weekend were totally clued up on Celiac and took it in their stride. For once I didn't feel I had a very limited selection or that I could only have sub-standard dishes without the sauces and so forth as is so common in other places.

For the wedding I wanted a dress and jacket as it is November and you never know on the weather. It was actually pretty warm for the time of year but the jacket was still a good idea.

After considering several patterns I went for these two.

Vintage Vogue 2859 from the thirties
I'm never going to look that long and slender but still it's an interesting design.

and
Butterick 4919 which is again a vintage pattern this time 1950's

I planned to use the jacket from the first and the dress from the second but with a straighter skirt as I wanted evening dress not ballgown in feel. In the end I took the skirt off the dress in the first pattern which worked very well.

I did a mock up of the jacket in a leaf design cotton I got cheap from IKEA which I'll post when I've done the finishing touches to it as I stopped once I'd worked out what did and didn't work. Actually the fit was pretty good though the shoulder darts weren't quite right.

I mocked up the dress from the first pattern in a nice floaty satin I had spare, mostly to check the fit on the hips. Again I will finish it, this time as a nightly I think as it's a bit minimal on top for me to wear otherwise given my shape. I decided to add a couple of inches ease as while it fitted it was a bit TOO close to not show off lumps and bumps even with magic pants.

The dress bodice I used with no alterations. The pattern fitted quite well and is a very interesting design as there are NO side seams. The front pieces extend all the way round the back and are hook and eyed at centre back only then do you do up the back zip. Then the back panels extend and become the sash which you wrap round the front in a variety of ways then take round to the back to be done up ! Quite fun and very un-usual and really not that easy to do up on your own !

I made the final versions in two different fabrics. For the dress I used a silk/cotton mix satin which is one of my favourite fabrics, over the years I've bought it several times in different colours when I've had the chance and I had several yards of the lilac left I'd been keeping for something special for me.. I think this is good reason to use it.  I paired it with a slightly pinker toning Chinese brocaded satin with a cherry blossom design for the jacket.
 I think the back looks great, The flowers in my hair are free style machine embroidery on water soluable fabric which was mostly washed out and then they were dried in an egg box to give them some shape. I used the same colours as I embroidered the dress with.

Please ignore the slightly zoned look on my face I don't like having my photo taken and I think the champagne was starting to kick in by that point. If it looks like I'm in a tent it's because I was or rather a fantastic double teepee which is where we had drinks at the beginning of the reception.

I forgot to get a photo of just the dress so will have to get someone to do that for me later. The shoulders are still a little blocky on the jacket even though I adjusted them from the original design, My shoulders are so narrow I suspect it isn't an ideal design for me but I do love the seams on the back view and it went together surprisingly easily. The sleeves look a little long in that photo but there really arn't, however the fabric is one that creases if you look at it hence the amount of creasing on the sleeve.

The dress itself worked OK though when I put it on the neckline suddenly seemed very low and I could see a lot of bra but while I would add a bit to it next time I think it was mostly my rather unique viewpoint and not so bad from where everyone else sees it ! I embroidered two birds with flowers either side of the bottom of the front split which I think worked well though it's hard to see in the photo as I did it in toning shades. I considered doing more but time was against me and actually to it could easily have become too much. The sash ended up a little short so I put hooks and eyes on it then couldn't get them to work when I had to finished getting dressed on my own as Jon was off early being an usher so in the end I safety pinned it !  With jacket on no-one could see.

This is what  it should have looked like

 This is me and Jon, doesn't he scrub up well !  Probably be another ten years before I get to see him like this again !  The sash on the dress rather disappears in the very narrow gap between my bust and waist unlike on the pattern ! Oh well I'm never going to be a super model shape am I.

The wedding was fabulous, organised amazingly well by my new sister in law who is lovely as are the rest of her family and I wish them both many many years of happiness together.

Monday, November 01, 2010

My First Temari

I have been admiring Temari from afar for ages but it's only recently I have found out how they are made and realised I could make them with things I had around the house.

Temari are Japanese thread wrapped embroidered balls. Some people use styrofoam balls as a base but the traditional way is rice husks or fabric scraps. Now Fabric scraps I have lots of.  You then cover that with some batting  (I didn't for my first ones but when I find my bits of batting I will try this as well). Then some yarn and finally a layer of thread. The yarn and thread are wrapped as randomly as possible and in fact doing it this way can result in a surprisingly round ball. I did fairly thick layers of both to give me plenty to stitch through.


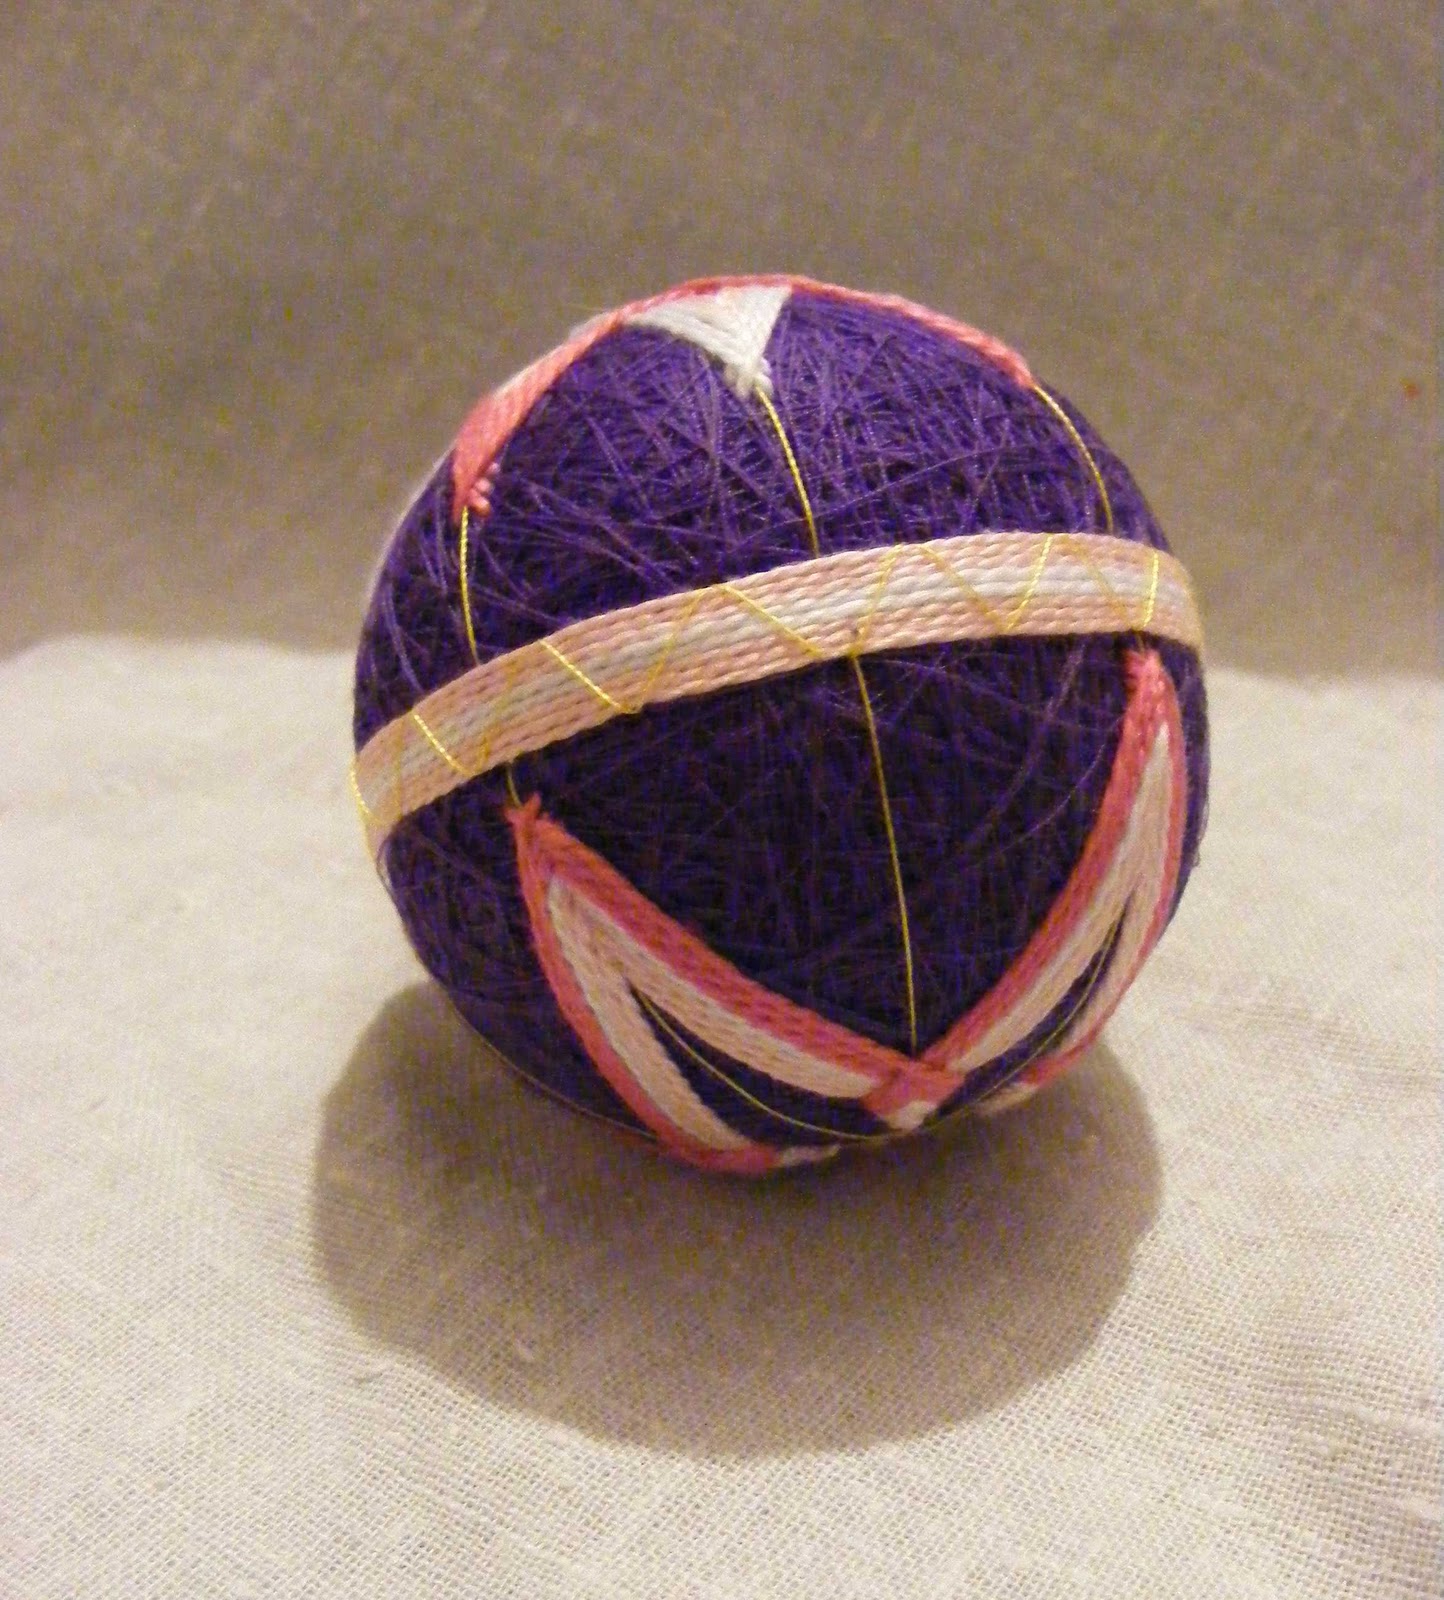
Here are my first two mari (the thread wrapped balls) The purple one is about 2.5" wide the grey one a little smaller. Temari can range in size quite a lot.

I also found a fabulous website which has lots of tutorials and help called Temarikai.com and they have an associated Yahoo group which seems very friendly and useful.

The purple ball has some gold threads on it these are the divisions, in this case it is divided into 8 even vertical sections and the pattern will be based around those threads. There is one around the middle of the ball as well. Getting these correct is important as if they are wrong everything else goes wrong.

One of the things the website says is learn the techniques rather than focusing on patterns and I always find that a very valuable thing to remember for most new crafts. For my first ball I did two versions of the same stitch. This is called Uwagake Chidori Stitch (translates as Zig-zag over stitch).


The first side I worked a simple version of the stitch making a four pointed star the bottom points of which nearly reach the middle of the ball.


The second side is doing the same thing but twice so they interlock with each other.


Finally I added an obi which is just several rows of thread laid round the middle of the ball with a simple zigzag of the gold thread over it.


I am really please with it. The ball has a lovely feel in the hand, a nice weight and very tactile. The boys love them too! Treestump has told me they are for throwing and Dominic after finding out they were originally made as play things rather than decorations wants me to make some to be played with so I might look at which designs would work well for that. I think it would need something that covers a good amount of the thread base so the threads can't pull easily and also a design that has fairly short runs of thread as the longer the run the easier it is to snag.

Tuesday, June 01, 2010

Other sea related makes recently


As well as the Merboy outfit I also made the birthday girl a present as it's traditional and all ! As I thought I had been told she likes bags I made her a little satchel style bag with some scale patterned fabric I found. To be honest had I found it in my stash earlier we would have had a blue Merboy as it's a lovely textured scale pattern. I embroidered it with a cheerful little dolphin I got from Artistic Threadworks ages ago and lined it with the leftover fabric from the costume. Finally I added a little strap and there you go, one ocean themed bag. Apparently I was right she love bags and she was very happy to get a bag of her own.


I also realised I never posted the fish I made. These were made back in March for Treestump and a small friend who was born the day before him. In fact she is the little sister of the girl for whom I just made the bag.
These fish are made from a bought pattern! Very uncommon for me but the pattern is by Mimi Kirchner who's blog Doll I read regularly.. I love her work and I thought the fish were great. It may not be much compared to buying one of her lovely dolls but I like to support other crafters when I can so buying the pattern seemed a good way to do that and saved me trying to work out good proportions. Treestump was then and still is obsessed with fish.. you should have seen him run round the local fish shop when we took him thee recently to ask them questions about keeping some basic goldfish he couldn't stop going from tank to tank.. He just kept pointing and saying Pish!!


So the top fish was for our little friend and seemed to go down very well. The body fabric is a shirt form the charity shop, the fins are fleece blanket from IKEA and the head is from a pair of my old trousers which i kept to take a pattern off but the pink/grey fabric just worked so well with the body fabric!


The lower fish was for Treestump and is a very cuddly cashmere jumper for the body, another IKEA blanket for the fins and a scrap of blue and black wool for the head. He got it a day early so he didn't get upset we were giving a fish to someone else! However he seem perplexed the mouth didn't open and Noddles wanted a fish to give him too! So que fish number three !


This is an adaptation on the pattern to give an open mouth and is made with some charity shop trousers (hence the pocket in the body) some more of my pink trousers and the fins are from an old set of Treestumps own trousers which we wanted to keep in some way. He loved that one too and kept making it kiss us !

So the fish are now nicknamed hugging fish and kissing fish!

Friday, July 18, 2008

This week I have mostly been making bags.

Firstly I made three bags for Small's teachers (and teaching assistants) at school, turns out he has actually been taught by four but he didn't tell me that till the last minute so sorry to the one who missed out.

The bags are based on one I received at an NEA conference and which I find the BEST bag ever particularly for carrying books.

Here are all three with added cat.

Each is embroidered with a different design though all three come from the same place, Embroidery libary who luckily had a sale on school related designs recently. Each design had about a 80 min stitch time and lots of thread changes so they were not quick to stitch but they look good. The top one says Teachers have class and is for his teacher. The other two are for his teaching assistants. The one on the left is a bookworm and blackboard, the other says the Dog eat my lesson plan because one of them is off to train as a full teacher and a very good one she will be too. They have all been wonderful and made his first year at school something to remember for all the right reasons and I'm not just saying that because they gave him the yearly award for his class !

They all have an inner pocket and as well as the long strap there is a handle type strap on the top of the bag but they aren't visible on the picture.


I also make some money bags for himself to use at Maelstrom. But being as they were for the Compt I felt they needed to be a bit more interesting than just calico so I broke out some corseted ladies I picked up from BFC Creations a while back with himself in mind when I got them. The first one I made was a bit big so I made three more smaller ones.

Claire named them boudoir bags which I think is a good name and the larger one is big enough for a small pair of shoes. will probably be making some more perhaps in other fabrics and a little bigger for just that purpose.

As always click on the pictures to get a bigger version.

Blog Content

All of the photographs on this blog have been taken by Esther, that's me, unless they are being used to link to giveaways etc in which case they belong to the person who I am linking to. All text is my own words.
None of the content of this blog may be used without my permission.