Sunday, August 30, 2009

Sunday Stash


It's all IKEA's fault.. they are selling fabric at 49p and not just any fabric but the fabric I bought a while ago to make a Regency day dress.. so I may have a bit more now as in a couple of half bolts of different designs. The original one I bought is the same as the pale blue design but in navy.

I really like the black best except I am not sure what the number is all about and it rather jars with the rest of the design which is why i got the navy orginally..

Sunday, August 16, 2009

A pile of random stuff

So what do you make with a pile of stuff like this?

A random assortment of bits of foam, a light green bed valance sheet, an old and tatty baseball cap, a small plastic mixing bowl, paints, PVA glue oh and not in the photograph some small latex cast horns and contact adhesive as well as a sewing kit.. Most of these items were just knocking about in case they came in useful. I bought the bowl and the sheet, the second was on sale and was quicker and easier than dyeing something which as I forgot I'd promised to make this thing till the last moment was important. Yes even the latex horns were knocking about.. the workshop where my friend makes latex prosthetics but they were random spares rather than made specially.

So what is this all for you ask.. Isn't to obvious? NO?

Well what if I tell you it's because we have a birthday treat trip for my nearly six year old, one that has been booked for most of the year?

A treat where we got to sit within feet of these.and roared at by thisWatched this fly over the sea.and this lumber about as well as many others.That's right we went to Walking with Dinosaurs and what self respecting young boy goes to such a birthday treat without a dinosaur costume? Of course I couldn't do any old dinosaur, no generic ones for us thank you. The type has to be discussed and thought about. In the end a pachycephalosaurus was decided on, or as he prefers to call it the headbutting dinosaur.. The image is from the encyclopaedia britannica and the whole article can be found in this link.

So with less than a day to go by the time everything was collected together I started attaching bowls to hats and covering it with foam and fabric. As well as making a top with attached tail!

While there are many things I think I can improve on I don't think it came out to badly given the time constraints. So here is our version of a pachycephalosaurus.

Hope you like it he did.

Tuesday, August 11, 2009

A recent scrapbook page

I am particularly happy with this one, in fact I really like just the patterned paper with the picture of Noodles on it's own too.. I think the extracting of the picture and leaving some partly merged grasses from the background worked really well with the detailed paper.. Which do you like best?

This one
Or this?

Monday, August 10, 2009

Canel trip

We have been away for nearly a week on Tom's parent's canal boat, the lovely and beautiful Apple Queen. She is 62 foot long I believe and very well kitted out inside for what is not a very big space. In the mosaic below you can see her outside and indeed about half the inside. What you can see is the sitting area, which is set as a double bed in the photo, the dining table and kitchen beyond.. In front of that is the bathroom and another bedroom. The dining table area also converts to a double bed so in all she sleeps 6.

It has been lovely and peaceful pottering along the canal and though we did have limited internet access it was slow and only really used to check for urgent emails. The boys enjoyed themselves very much though of course a 16 month around that much water needs careful watching particularly around locks which are potential death traps if you fall in one especally so when the water is going in or out.. For any that don't know a lock is a short contained area of canal long enough for a boat and wide enough for one or sometimes two boats. It is shut off at each end by a gate and you can then open various paddles to raise or lower the water level allowing canels to go up and down with the geography. There is a max speed of four miles and hour and often you have to go slower than that to avoid damaging the bank with the wash or rocking moored boats so live is very relaxed and slow..

The scenery was fantastic and I am sure you will see some more photos later though we did have to dodge the rain at times and by the time the sun was out I had run out of battery power and kept forgetting to recharge them.

I did get some crochet done in various moments which I will blog about later but for now it is bedtime for the smallest. I'm adding this post to the mosaic monday list over at Little Red house so pop over there for more eyecandy.

Monday, July 20, 2009

Green


These are a few images from the allotment taken last week including the lane I mentioned a few posts ago.

For Mosaic Monday over at Little Red House. though she isn't running the round up this week.


Sunday, July 19, 2009

I won again!!

I recently entered another giveaway this time from Yvonne from Joharo at home. She makes lovely jewellery and offered a place in a draw for a personalised necklace in exchange for a little market research.

I was very, very pleased to win as the example necklace looked fabulous. My custom one turned up on Saturday and is fabulous. I got a purple and blue version which will go with most of my clothes perfectly and as it is so long it can be worn in many different ways.

Yvonne packages her jewellery very prettily in a lovely little bag with pink tissue keeping it safe and tiny rose buds nestled on top of the paper.

Once I unwrapped the necklace you could see the lovely hand picked beads, combined with some really lovely wire shapes and wire wrapping. I truly wish I was close enough to consider doing a workshop with her because her work is very even and well done, having tried it a bit in the past I know that isn't all that easy.

I shall wear this quite often I think though perhaps not when the smallest is wanting to be carried about a lot as he is a little to keen to pull on it and I really don't want it damaged!! The necklace can be worn various different ways depending where you hook the end on to the rest of the chain of elements and I even managed to put it on as a double wrapped choker whichwas quite pretty.

Talking of giveaways I have just noticed I am nearly at 200 posts so i will have to think about what to do to celebrate!

Saturday, July 18, 2009

Fabric baskets for Teachers

Jumping firmly on the bandwagon as it is a very nice and pretty band wagon I to used Pink Penguin's lovely basket tutorial to make teacher gifts for Noodles two teachers, one teaching assistant and one ex-teacher who is leaving and ran cooking club this term which he loved. She was his first teacher and I can't praise her enough for getting him up and running and really and truly enjoying school.. I just hope it lasts as he goes up the school.

This years teachers have been wonderful as well and his report was glowing. Just as importantly he loves school, enjoys going and does a whole bunch of different activities.

I made two of each colour scheme and they are just the right size for a packet of chocolate covered hobnobs and a few extra bits and pieces. Plus of course little cards from the small one himself.

GIMP Tutorial

I have talked to a couple of people recently about using GIMP for scrapbooking and similar so thought I would cover it a little bit more here. GIMP is a great package which does pretty much anything Photoshop does at least for us mortals. The great thing about GIMP is that it is open source which means it if free and constantly undated by a wonderful bunch of people who write new bits because they can and like doing it, in fact anyone can join in if they like or do their own bits that is what open source is all about. That really appeals both to my none capitalist side and to the geek in me.

While I am not an expert I have learnt a bit on using GIMP over the last year or so and offered to do a tutorial or two, so here goes. This is the very first one I've ever done and is how to use GIMP to make a mosaic as Mary over at Little Red House hosts a Mosaic Monday and Kamana at Journalling Through Photos mentioned she was looking at other options for make mosaics. I think learning to use an adaptable package like GIMP means you have many more options that a specific mosaic package though those are great too.

First you need to download GIMP, there are plenty of places to do this but I'd go here as it is the official source.
http://gimp-win.sourceforge.net/stable.html

Once you have GIMP installed open it up.
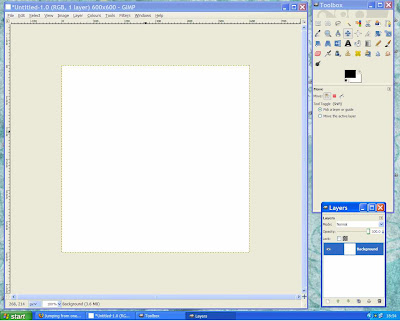
You will have the toolbox and a document open up each in their own window.

First thing I suggest you do is go to the menu bar on the document window, pick Windows, dockable dialogs and then pick layers. This opens a third small window, make sure you can see all three as they can hide behind each other.

Then you need to decide what size document you want. I picked 600 by 600 pixels which is a good size of using on line, it's the sort of size most scrapbooking forums suggest to load up scrapbooking pages and gives you enough space to have good detail without being to big, it is also easy to divide by 3 which for the design I am planning is useful. To do this pick New from the file menu on the document window, fill in the number of pixels you want. (you can also chose to do this in inches, mm etc if that seems more understandable).

You should end up with something looking like this. (All pictures can be seen in larger versions by clicking on them)
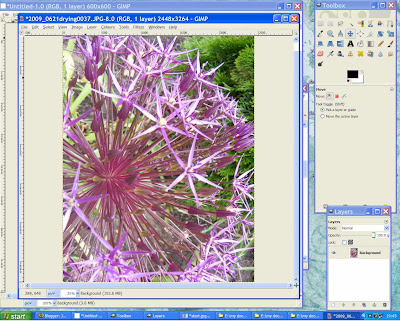
Next find your images, open up the first one by going File , open.. search for the image you want on your computer and open it. Now you will have your picture in another window.

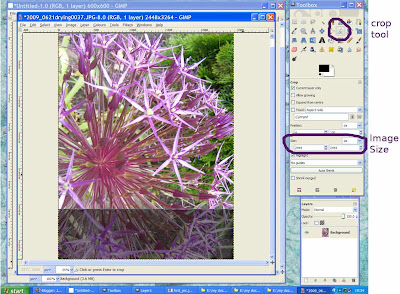
You can use as is or crop it down to a shape you want, for instance square. To crop you need to pick the crop tool from the toolbar, which looks a bit like a craft knife. I have highlighted it in the next picture. The click on one corner of your image and drag the cursor across and down, keep an eye on the two numbers in the size fields and when the two match you have a square. The area you have not selected will be greyed out.
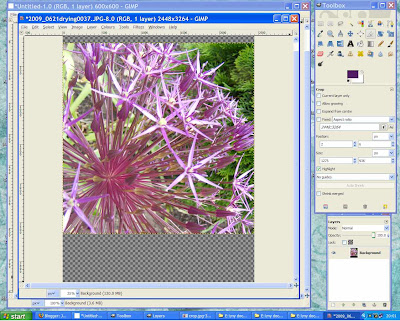
You can move the selected area about by clicking and dragging in the middle and indeed you can change the size by hovering over an edge till you get a little split line with a triangle behind it, clicking and dragging will move that side of the selection only. However a click without dragging will crop the image to your selection. This leaves you with a canvas bigger than your image which is what the chequered background means in the image below. To get rid of the selection just click somewhere outside the selection.
There are many other things you can do to the image but that is another tutorial. At any point you can go back to a previous step by going Edit, undo.. you can keep going back as far as you like.

Now you want to get the image to a sensible size to go in your main document as if your camera has the sort of resolution most do these days it will be far too big for document. Go to the Image menu and pick scale image. Put 600 in the width, click on the height and that should change to be the same as the width because your image is square. Click scale and you will have a smaller image.

Now we have a picture we need to transfer it to our main document. This is simply done by picking copy from the edit menu just as you would in word. Then go to the main document and pick paste from the edit menu. At this point you will probably find the image is not showing properly.

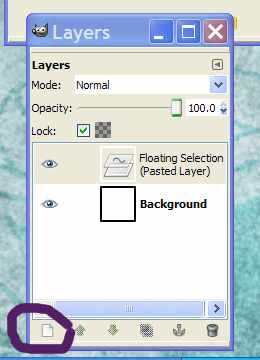
Go to the layers window you will see two items, a background and one labelled floating selection, you need to confirm this before going on. Click on the little page symbol at the bottom left, this confirms the layer and changes it to pasted layer.

Do the same with other pics.. which will give you a whole bunch of layers showing in the layers box but you will only be able to see the top on in the main window as they all fill the space available. You can use Image - Transform to rotate if needed.

Now you need to decide what layout you want. I decided to go for one big picture 400x400 and then several 200x200 pictures around two sides of that.. like this
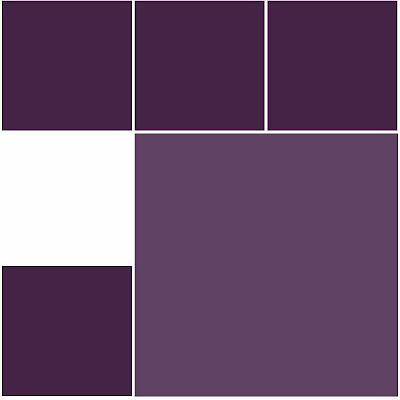
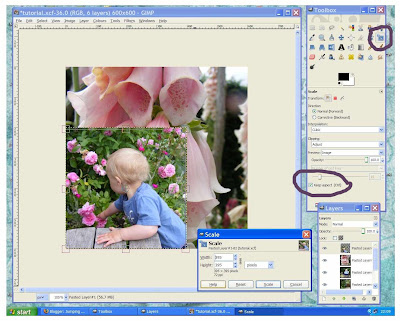
To get this we need to change the size of all the photographs. You can either do this using the Layer menu and pick scale layer or use the scale tool. Make sure you take a little off for the size you make it so you have a border. For instance I made the 400x400 one 395x395.

The scale tool is marked in the next photo, remember if you want to keep the scale the same click the keep aspect button at the bottom of the toolbar.
If you want to see layers lower down you can hide the upper ones by clicking the little eye symbol next to the upper layer this hides the layer.
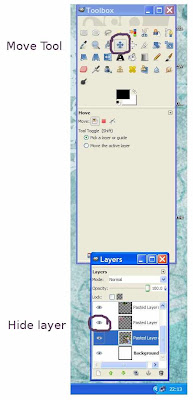

Once you have sized the photos you need to move them to where you want them. Use the move tool, the one with four arrows pointing north, south, east, west. Make sure you have the layer you want to move clicked and the cursor needs to show the same symbol as the move tool without a pointing hand. You will see what I mean when you move the cursor around. Then just hold down the left hand button and move the photograph to where you want it.

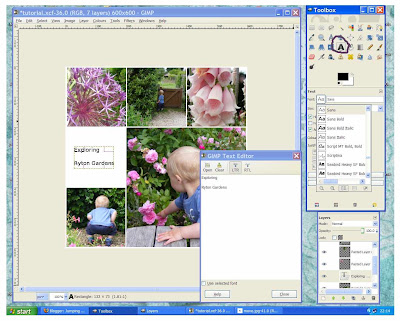
You can use the text tool (the big A) to add text. As you can see below you can the font and of course size etc. You get an extra window open up to type the text in so if you don't see it try moving the others around or look for it on the bottom bar which you have all the links to windows.
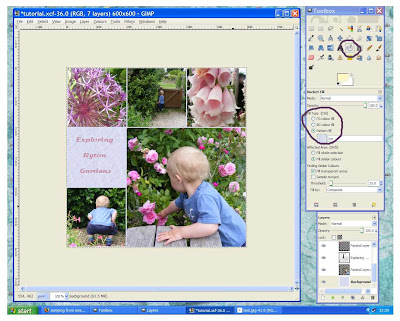
Finally you can change the colour of the background. To do this scroll down the layer window till you find the bottom layer labled background. Then pick the fill tool, the one that looks like a paintcan with paint flowing out. You can pick the fill, in this case I picked a pattern called ice. If you pick background or foreground colour you can change the colour by clicking on the coloured boxes just below all the tool symbols and picking the exact shade you want.
Finally save the file. If you want to work on it again or save it to use as a template for another mosaic then save as a .xcf file. Then for the version to post up on your blog save it as a .jpg. You will be asked if you want to export it, say yes and then pick about 45% for the quality seems to work well for me and gives you a sensible size file.

Well there you go I hope that is some help and I am sure it could be better written so please say if any bits are unclear.

Monday, July 13, 2009

Mosaic Monday


Mary over at Little Red House runs Mosaic Monday and as I'm quite fond of mosaics I decided to join in.

A visit to Ryton organic gardens a few weeks ago. I didn't manage to get a picture of him with low box hedges but they fascinated him.

Sunday, July 12, 2009

Sunday stash - I won a give away!!


The fabric today are ones I recently won on a giveaway from Some day I'll be. I won three wonderful seaside fabrics, I hope she doesn't mind but I nicked the giveaway picture as my camera keeps being take off on trips by other people than me :) The fabric is glorious, even nicer than the photo and the beach huts very similar to ones at the beach near my in-laws so assuming we manage to get down there this summer then I will take some more photos of them and think about making something with the fabrics and the photos.. I have an idea so watch this space but it may be a while.

You can see the beach huts in this picture a bit which I posted a while back.

Thursday, July 09, 2009

Scrapbooking Potato flowers


A page done for the Miracle gro challenge on Digital Scrap Garden, Ladybug always does such lovely kits for the challenge and I really like doing one step at a time and seeing other people's pages gradually build up. It is a real learning experience and would I suggest it to anyone getting into scrapbooking who is unsure about putting together papers and elements and photos.

The photos themselves are just various different potato flowers but I like them and I thought a fairly simple layout suited the mudane but pretty nature of the flowers.

Wednesday, July 08, 2009

Simple things

Christina from Soul Aperture is hosting a Simple things day where we celebrate the simple things that make life wonderful. Different for everyone but if we savoured them a little more the world would be a much brighter place. So here are a few of mine.

Currently one of my favourite things is the hedge lined lane that leads from the top gate of the allotment site down to the middle car-park that our plot is adjacent to. I love the feeling of the hectic modern city life falling off your shoulders and the feel that you are driving or walking down a country track. If we had a standard open allotment site it would be a very different atmosphere but while our hedges have to be kept low enough to look over for security that is about 5 foot which is a struggle for me to look over and high enough to strongly remind me of the Devon hedges I grew up with. I don't have a photo of the lane and I don't know why next time I have the camera up there I will take one though I'm not sure a picture will really convey the feeling. For many years I have had a form of spring depression where I get very frustrated as the plants come to life that I can't walk along proper country lanes and into the woods, this year is the first time I haven't felt that and the allotment is the main reason for that.

Growing my own food however random and prone to gluts and gaps this year is. Particularly the variety and colours of potato leaves and flowers, we are growing a few each of about 20 varieties. Isn't this stripey one pretty !!Black currents - little balls of pure heaven and Treestump thinks so too !
He seems to share my fasination with trees too.
Treestump and the cute way he gets so excited and jumps on the spot going yes, yes when you get his bedtime drink ready.

The fact Noodles insists that Treestump's proper given name includes Treestump Stormtrooper as well as those names on his birth certificate.

The way both boys give me hugs and kisses for no reason other than they want to.

Fabric and the ability to make it into something more.

The smells of tomato leaf and gunpowder though not nessaceraly at the same time :)
The monthly box of chocolate from Hotel chocolat and sharing it with the boys, well I share a bit anyway.

Tuesday, July 07, 2009

Just a quick scrapbook page


Done for my mum of the recent roleplay pictures. Using a lovely kit from June at Cen's Loft called My little Garden.

Monday, July 06, 2009

As promised a couple of action pictures

Here are the trousers and robe from the previous post in action, indeed he is also wearing the shirt which I made along with them. he is carrying LARP arrows in case you are confused they are like normal arrows but with a huge piece of foam on the front for safety which means they mostly fly like a brick :)


Finally this one just because i like it, I have no idea where the tunic he is wearing came from suppose I could ask his dad..

Saturday, July 04, 2009

Finally making things again

I know I've not been blogging on here much, there has been a little more on my food blog but mostly you need to read the allotment one to know what I've been about it is summer after all and everytime you turn your back the weeds are growing again but I've been loving it, it's a very uplifting place. I have considered combining them all together at times but I like having them separate and all my blogs are as much a diary for me as for public reading so if you are interested in all the different aspects of my life I'm afraid you will have to read all the different blogs :) On the plus side if you don't want cooking and gardening this way means you only get the relevant stuff.

Anyway on to the sewing. Noodles is off this weekend with his dad at a live roleplaying event. It isn't his first but we stopped taking him when he got to two and he doesn't really remember going so at the grand age of nearly six he is going to one where he gets his own character and everything. Costume wise he has ended up with rather a mix, he has a jedi robe and shirt I made him for last birthday plus a couple of waistcoats of mine (or in the will be useful for roleplay at some point pile) I also made him another basic shirt, a pair of hero pants plus I added sleeves to yet another might come in useful one day waistcoat to make a second over-robe. Finally he has a waxed hood and a cloak of mine made from army blanket for when it rains. The cloak is a shoulder cloak on me which makes it a good length for him!

Hopefully I will have better pictures after the event as they have my camera with them but for now you will have to make do with a couple of very hasty pictures taken on the washing line. The hero pants look much better on as they bag nicely over the cuffs. He started swaggering the moment he tried them on!!As I said the coat was an existing patchwork waistcoat so I just found some velvet and other fabrics that roughly worked in the colour scheme and added some very full sleeves. I will probably add some matching decorative stitching to match the body later but as usual I was doing things last minute.

Thursday, June 04, 2009

Sewing machine meme

Sew mama Sew is collecting information on the machines people use and what they think of them as a resource for those looking to get a new machine which sounds like a plan. Problem is I have several machines. In total I have a Brother Mark three industrial machine, a Janome general purpose one (366), the janome 300E (dedicated embroidery only), a four thread differential feed overlocker (serger) again by Janome and some battered old machine I lend out who's make I can't currently remember and it isn't on hand at the moment, I have been considering getting a kit to convert that one to a needle felting machine as I'm not allowed to buy a new dedicated one !

The reason for the number of Janome machines is I worked for them for a while which means I know them better than most makes plus they are one of the few to do dedicated embroidery machines.

Anyway they want a bunch of questions answered for your machine so i thought I'd do that for at least some of them. As they didn't mention overlockers I will not do that one or the one who's make and model I can't remember the rest I think I'll combine together and answer.
-------------------------------------

1)What brand and model do you have?

Brother Mark III Industrial, Janome 366 (UK version), Janome 300E - dedicated embroidery

2) How long have you had it?

The Mark three at least ten years, it was second hand then. The 366 a bit less time and the 300E 3 or 4 years I guess

3) How much does that machine cost (approximately)?

The Mark three was a hundred or so pounds I think. The 366 is a low to mid range basic machine but I don't remember how much.. I know I couldn't quite afford one with the dedicated buttonhole foot which I really wanted but it does a really good satin stitch. The 366 was 6-700 pounds.

4)What types of things do you sew (i.e. quilting, clothing, handbags, home dec projects, etc.)?

Yes all of those plus tents, padded armour etc If it's made of fabric or leather I have probably tried it at some point. The reason for the Mark III is alot of the things I make would break a domestic machine such as tent canvas, medium weight leather and so on.

5) How much do you sew? How much wear and tear does the machine get?

It varies, not a huge amount currently but in the past I have worked full time making costumes, tents etc.

6) Do you like/love/hate your machine? Are you ambivalent? Passionate? Does she have a name?

I am very fond of all these three for different reasons.

The Mark III is called the Beast.. you need very good clutch control or she will try and eat you but once you get used to the speed a domestic feels SO slow.

The 366 doens't have a name but is a great generic machine.

The 300E is a great embrodery machine and I like having it separate to my normal sewing machine.

7) What features does your machine have that work well for you?

Mark III only does straight stitch, forwards and backwards.. which is fine as I have other machines.

The 300E is a dedicated embroidery machine it ONLY does that, no normal sewing at all. However it does that very well and is not really cut down features wise from the all singing all dancing one it was based on but was a lot cheaper.

The 366 is a good generic machine and has a very good satin stitch which is the main thing I use it for. I rarely use many other stitches.

8) Is there anything that drives you nuts about your machine?

Not really, though I do wish I'd found the money to get a machine with the buttonhole foot you put the button in and it makes the hole for you cos I hate doing buttonholes.

9) Do you have a great story to share about your machine (i.e., Found it under the Christmas tree? Dropped it on the kitchen floor? Sewed your fingernail to your zipper?, Got it from your Great Grandma?, etc.!)? We want to hear it!

The Mark III scares people ! It has a fly wheel so your turn in on and it sits there whirring at you till you put your foot down and then the fabric (and your hands if you aren't careful) jumps forward at a rate of knots. !! Once you get past the FEAR though it's fantastic to sew that fast for big items.

10)Would you recommend the machine to others? Why?

Yes all three are good for the jobs they do.. obviously two of them are fairly specalised but if you want that they do the jobs very well.

11) What factors do you think are important to consider when looking for a new machine?

Knowing what features are important to you and which are not. Consider the weight of fabrics you are likely to want to sew, no point going for a featherweight for you want to sew lots of winter coats it will die. how much room do you have? If you want lots of features and have the space consider getting more than one machine that specialise but if you are short on space you need one that is a good all rounder.

12) Do you have a dream machine?

I have a list of features I'd like but not a specific machine and I'm not sure I'd want only one however good it was.. Currently I want a needle felting machine.

Tuesday, June 02, 2009

Sunday stash on Monday

Missed the right day due to running about doing stuff at the allotment and Tom being very much worse the wear from a tooth problem. Hopefully the dentist has solved it enough that he will not be in serious pain and they can sort it properly in a couple of weeks.!

Anyway fabric today was bought recently when I was dragged up the Foleshill to go to Tahim Drapers as it is such a dreadful thing to have to do !! Seriously it's dangerous for your pocket. This is their on-line shop if you don't believe me. The shop itself is quite a big space and has many, many types of fabric. A lot for Indian suits, ie the tunic, trouser and scarf sets, which means you get lots of designs where you have two or three complimentary fabrics but you often have to buy similar amounts of each as they are sets. they do a whole bunch of other fabrics too and trim and well you get the idea.

We went for a pattern and some buttons and I came out with three metres of this.
Coloured tissue under the bottom half to show possible effect.
Not sure what it's for yet. It is a fine unbleached colour with embroidery all over baring a couple of inches by the selvage. as you can see from the picture the embroidery is circles akin to the ones used to hold bits of mirror on fabric and smaller eyelet type work.. I think it might become sleeves and possible a yoke for a shirt and maybe a skirt over a coloured lining though fabric this light and small boys has problems.

Thursday, May 28, 2009

Noodles and the lion.


Take one small ladies shirt from the charity shop, bought because of the line print of chinese lions and flowers. Add one small boy and it becomes a colour your own shirt, after mum has washed it and taken in the sides of course. So far one lion and a flower have been coloured but apparently there will be more!

Sunday, May 24, 2009

Sunday stash


Today's stash is fabric which is currently made up, the stripe is a shirt and the flora is an Edwardian dress which really didn't suit me, sorry it's rather creased it's been in a bag for a while.. There is quite a lot of the floral and the design of dress means it is mostly still big panels. It is a very soft but well woven fabric so I'd like to make something more wearable with it and I keep seeing the two fabrics together and wondering if they will work together, if anything the colours are more similar in real life to the picture.

Editted to say --- the stripe is very similar to my crochet squares now i see them together on the screen.. I seem to be developing a colour theme!

Crochet

I have been doing some crochet though all be it very slowly.

I think I have one and a half squares I haven't posted as yet but I am well behind on the idea of doing several squares a month.
First off we have the Irish rose square. I really like the raised rose in the middle but the main part of the square seems to have come out rather bigger than the rest of the squares so it might get a couple of rows removed. I'm not deciding till I get to amking them all up into something though.
The other is the middle of waldo's rings. The rings are somewhat mind bending but I got there in the end with a little help! I need to finish the surround on this one though.

Blog Content

All of the photographs on this blog have been taken by Esther, that's me, unless they are being used to link to giveaways etc in which case they belong to the person who I am linking to. All text is my own words.
None of the content of this blog may be used without my permission.