I have talked to a couple of people recently about using GIMP for scrapbooking and similar so thought I would cover it a little bit more here. GIMP is a great package which does pretty much anything Photoshop does at least for us mortals. The great thing about GIMP is that it is open source which means it if free and constantly undated by a wonderful bunch of people who write new bits because they can and like doing it, in fact anyone can join in if they like or do their own bits that is what open source is all about. That really appeals both to my none capitalist side and to the geek in me.
While I am not an expert I have learnt a bit on using GIMP over the last year or so and offered to do a tutorial or two, so here goes. This is the very first one I've ever done and is how to use GIMP to make a mosaic as Mary over at
Little Red House hosts a Mosaic Monday and Kamana at
Journalling Through Photos mentioned she was looking at other options for make mosaics. I think learning to use an adaptable package like GIMP means you have many more options that a specific mosaic package though those are great too.
First you need to download GIMP, there are plenty of places to do this but I'd go here as it is the official source.
http://gimp-win.sourceforge.net/stable.html
Once you have GIMP installed open it up.
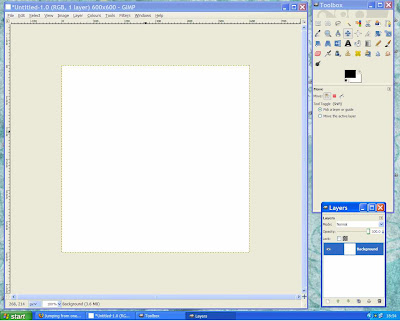
You will have the toolbox and a document open up each in their own window.
First thing I suggest you do is go to the menu bar on the document window, pick Windows, dockable dialogs and then pick layers. This opens a third small window, make sure you can see all three as they can hide behind each other.
Then you need to decide what size document you want. I picked 600 by 600 pixels which is a good size of using on line, it's the sort of size most scrapbooking forums suggest to load up scrapbooking pages and gives you enough space to have good detail without being to big, it is also easy to divide by 3 which for the design I am planning is useful. To do this pick New from the file menu on the document window, fill in the number of pixels you want. (you can also chose to do this in inches, mm etc if that seems more understandable).
You should end up with something looking like this. (All pictures can be seen in larger versions by clicking on them)
Next find your images, open up the first one by going File , open.. search for the image you want on your computer and open it. Now you will have your picture in another window.
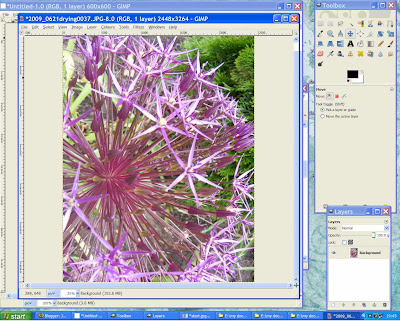
You can use as is or crop it down to a shape you want, for instance square. To crop you need to pick the crop tool from the toolbar, which looks a bit like a craft knife. I have highlighted it in the next picture. The click on one corner of your image and drag the cursor across and down, keep an eye on the two numbers in the size fields and when the two match you have a square. The area you have not selected will be greyed out.

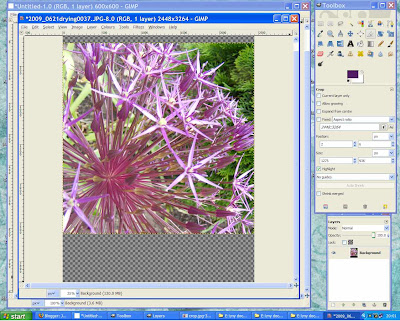
You can move the selected area about by clicking and dragging in the middle and indeed you can change the size by hovering over an edge till you get a little split line with a triangle behind it, clicking and dragging will move that side of the selection only. However a click without dragging will crop the image to your selection. This leaves you with a canvas bigger than your image which is what the chequered background means in the image below. To get rid of the selection just click somewhere outside the selection.
There are many other things you can do to the image but that is another tutorial. At any point you can go back to a previous step by going Edit, undo.. you can keep going back as far as you like.
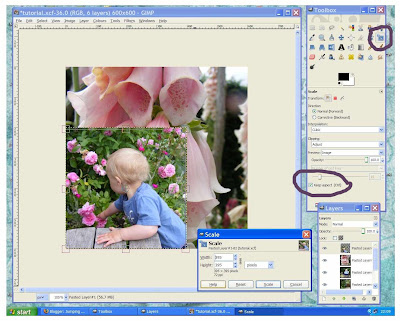
Now you want to get the image to a sensible size to go in your main document as if your camera has the sort of resolution most do these days it will be far too big for document. Go to the Image menu and pick scale image. Put 600 in the width, click on the height and that should change to be the same as the width because your image is square. Click scale and you will have a smaller image.
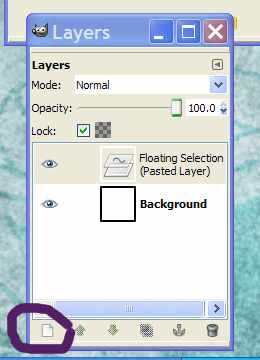
Now we have a picture we need to transfer it to our main document. This is simply done by picking copy from the edit menu just as you would in word. Then go to the main document and pick paste from the edit menu. At this point you will probably find the image is not showing properly.
Go to the layers window you will see two items, a background and one labelled floating selection, you need to confirm this before going on. Click on the little page symbol at the bottom left, this confirms the layer and changes it to pasted layer.
Do the same with other pics.. which will give you a whole bunch of layers showing in the layers box but you will only be able to see the top on in the main window as they all fill the space available. You can use Image - Transform to rotate if needed.
Now you need to decide what layout you want. I decided to go for one big picture 400x400 and then several 200x200 pictures around two sides of that.. like this
To get this we need to change the size of all the photographs. You can either do this using the Layer menu and pick scale layer or use the scale tool. Make sure you take a little off for the size you make it so you have a border. For instance I made the 400x400 one 395x395.
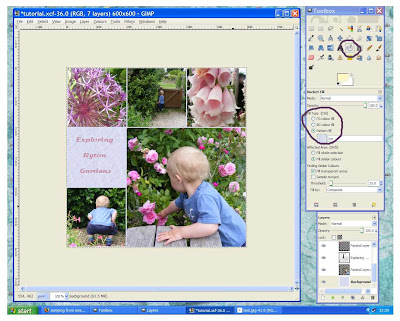
The scale tool is marked in the next photo, remember if you want to keep the scale the same click the keep aspect button at the bottom of the toolbar.
If you want to see layers lower down you can hide the upper ones by clicking the little eye symbol next to the upper layer this hides the layer.
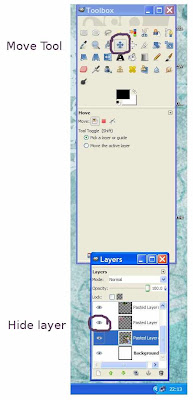
Once you have sized the photos you need to move them to where you want them. Use the move tool, the one with four arrows pointing north, south, east, west. Make sure you have the layer you want to move clicked and the cursor needs to show the same symbol as the move tool without a pointing hand. You will see what I mean when you move the cursor around. Then just hold down the left hand button and move the photograph to where you want it.
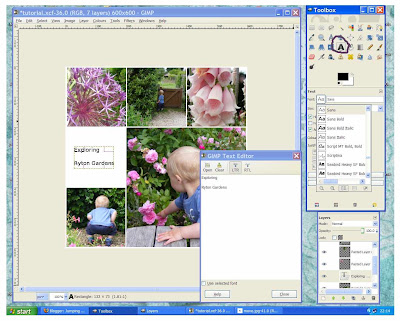
You can use the text tool (the big A) to add text. As you can see below you can the font and of course size etc. You get an extra window open up to type the text in so if you don't see it try moving the others around or look for it on the bottom bar which you have all the links to windows.
Finally you can change the colour of the background. To do this scroll down the layer window till you find the bottom layer labled background. Then pick the fill tool, the one that looks like a paintcan with paint flowing out. You can pick the fill, in this case I picked a pattern called ice. If you pick background or foreground colour you can change the colour by clicking on the coloured boxes just below all the tool symbols and picking the exact shade you want.
Finally save the file. If you want to work on it again or save it to use as a template for another mosaic then save as a .xcf file. Then for the version to post up on your blog save it as a .jpg. You will be asked if you want to export it, say yes and then pick about 45% for the quality seems to work well for me and gives you a sensible size file.
Well there you go I hope that is some help and I am sure it could be better written so please say if any bits are unclear.

 I recently entered another giveaway this time from Yvonne from Joharo at home. She makes lovely jewellery and offered a place in a draw for a personalised necklace in exchange for a little market research.
 Once I unwrapped the necklace you could see the lovely hand picked beads, combined with some really lovely wire shapes and wire wrapping. I truly wish I was close enough to consider doing a workshop with her because her work is very even and well done, having tried it a bit in the past I know that isn't all that easy.
 I shall wear this quite often I think though perhaps not when the smallest is wanting to be carried about a lot as he is a little to keen to pull on it and I really don't want it damaged!! The necklace can be worn various different ways depending where you hook the end on to the rest of the chain of elements and I even managed to put it on as a double wrapped choker whichwas quite pretty.
 Jumping firmly on the bandwagon as it is a very nice and pretty band wagon I to used Pink Penguin's lovely basket tutorial to make teacher gifts for Noodles two teachers, one teaching assistant and one ex-teacher who is leaving and ran cooking club this term which he loved. She was his first teacher and I can't praise her enough for getting him up and running and really and truly enjoying school.. I just hope it lasts as he goes up the school.


 To get this we need to change the size of all the photographs. You can either do this using the Layer menu and pick scale layer or use the scale tool. Make sure you take a little off for the size you make it so you have a border. For instance I made the 400x400 one 395x395.
 If you want to see layers lower down you can hide the upper ones by clicking the little eye symbol next to the upper layer this hides the layer.
 Finally you can change the colour of the background. To do this scroll down the layer window till you find the bottom layer labled background. Then pick the fill tool, the one that looks like a paintcan with paint flowing out. You can pick the fill, in this case I picked a pattern called ice. If you pick background or foreground colour you can change the colour by clicking on the coloured boxes just below all the tool symbols and picking the exact shade you want.
 Finally save the file. If you want to work on it again or save it to use as a template for another mosaic then save as a .xcf file. Then for the version to post up on your blog save it as a .jpg. You will be asked if you want to export it, say yes and then pick about 45% for the quality seems to work well for me and gives you a sensible size file.


 Black currents - little balls of pure heaven and Treestump thinks so too !
 He seems to share my fasination with trees too.
 Treestump and the cute way he gets so excited and jumps on the spot going yes, yes when you get his bedtime drink ready.


 As I said the coat was an existing patchwork waistcoat so I just found some velvet and other fabrics that roughly worked in the colour scheme and added some very full sleeves. I will probably add some matching decorative stitching to match the body later but as usual I was doing things last minute.